Create your own custom Collection Class
In the last tutorial we introduced the concept of Classes in Visual Basic. As is the norm, the world of software development has turned a simple, elegant concept into an exercise in pseudo intellectualism. However, if you’ve read the last tutorial I hope you understand what a class is and how they can help you write clean, elegant, maintainable code. By the end of this tutorial you will have created your own custom collection class but to recap from last time, a Class Module:
-
Allows you to create Methods, which are subroutines and functions within a class to help you write code once and once only, obeying the DRY Principle of Do Not Repeat Yourself
-
Takes all the good bits from variables and arrays to store values using Properties
-
takes all the good bits from Modules to help you organise your code in one neat well defined clearly named unit
Can you remember the exercises we did on the Visual Basic Collection Class? We created a Collection of my Visual Basic book library, iterated the collection, sorted and searched the collection. This code worked and it worked well.
In those tutorials we used the Visual Basic Collection Class to store my rather small collection of books on Visual Basic development. We chose this particular class as it is extremely helpful for storing lists of key value pairs. However a major drawback of this collection is that you can’t retrieve the keys once they’ve been added. It’s impossible to read a item’s key.
How can we improve on what’s provided out of the box?
Another potential flaw in our application architecture is the code to sort and search the collection is embedded in the Form. Which is fine in a one Form application. But what happens if we added another Form which wanted to make use of this code?
We could of course use a Module to organise the code. The Module could be called something relevant to sorting and searching a book collection – this would have the added bonus of making the code far easier to understand. However, do you remember when I said, a Class Module is like a Module on steroids? Let me show you how. We will create our own Collection Class which is specifically tailored for our needs, improving on what is provided out of the box.
Open Visual Basic, and open the Collection Class project.
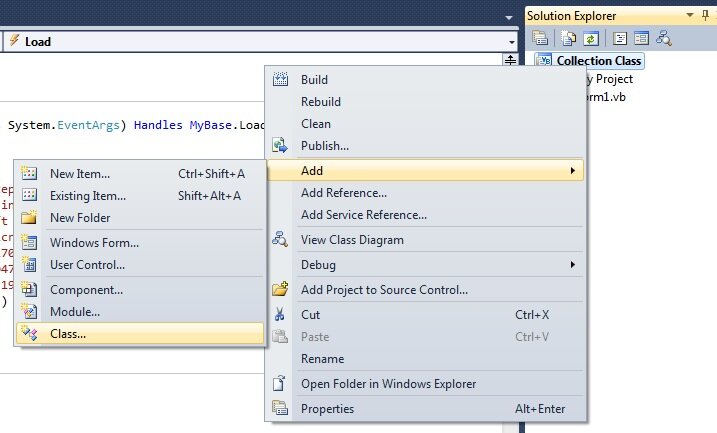
Add new Class to the Project by right clicking on the Project, Click Add in the popup menu and select Class… as shown below
Call this new Class VBBookCollection
Open the code Class Module and you’ll see the default code for creating a class
Public Class Class1

End Class
This declares a Class called Class1, the Public keyword tells Visual Basic that the class is accessible anywhere in our application. We can also use other accessibility levels but we will delve into that deeper in this tutorial. For now all classes are Public.
Change the code so the class is called VBBookCollection (Depending on how you named your class, this code may already be in place)
Public Class VBBookCollection

End Class
Behind the scenes, we could use an array to store my collection of books. However, as we don’t know how many books I may buy and may want to add and remove at runtime, lets use the Visual Basic Collection Class.
Public Class VBBookCollection
     Private col As Collection = New Collection
End Class
Why do we use the syntax NEW for collections but not for other variables? Classes are known as Complex Types. Integers, Strings etc are known as Simple Types. For all Complex Types we must explicitly create an new Instance of that type – by saying New. Complex Types can be memory intensive, we can store lots of information in variables of this type. To be as efficient as possible, we tell Visual Basic when we want to create the variable (variable = New Class). In addition, to be uber efficient, we can also instruct Visual Basic when we want to forget the variable by using the syntax variable = Nothing. This instructs Visual Basic to forget the variable and free the valuable memory.
Back to our class – we have a local variable called col which is of type Collection. This is a Private variable which means that it’s only accessible from within the class. It is not available to our Form. So how do we manipulate the contents of this class if its private? We will create our own Properties and Methods.
If you look closely at the Form, it makes use of the VB Collection Class Remove Method. The Visual Basic Collection Class Remove Method doesn’t return a value. Hence we’ll make our Remove method a Subroutine.
Add the following code to the Class
Public Sub Remove(ByVal isbn as String)
     col.Remove( isbn )
End Sub
In this code, whenever someone calls our Remove method we call the VB Collection Class’ Remove Method with little or no modification.
The Form also calls the VB Collection Class’ Contains Method, to check if an item exists in the collection. This method returns true or false. As we will need to return a true/false value, this method will be a Function of type Boolean.
Add the following code to your class
Public Function Contains(ByVal isbn as String) as Boolean
     return col.Contains( isbn )
End Function
Our sample app also needed to know the number of items in the collection. Add the following code.
Public Function Count() As Integer
     Return col.Count
End Function
Our sample app also expects an Item method, which would return a book in my collection.
Add the following code:
Public Function Item(ByVal isbn As String) As String
     Return col.Item(isbn)
End Function

Public Function Item(ByVal index as Integer) as String
     Return col.Item(index)
End Function
That’s right, add two functions of the same name. In our sample app we make use of the Item method in two places. In one case we passed the ISBN of the book, a String value, and the other we passed the numerical position of the book in the Collection. In Visual Basic .NET we can create two subs and functions of the same name, as long as the definition of the Sub or Function is different. The more technical term is the signature of the Sub or Function must be different. In this case, we have passed a key as type String and the Index as type Integer to the two functions. This is called Method Overloading and is very powerful when used well. Visual Basic will work out what particular version of the method to call depending on what you pass to it. It makes the code a lot more logical. The two functions serve the exact same purpose, to return an item, so it makes sense that they have the same name. In VB6 days which didn’t allow Method Overloading, we would have to declare Functions with convoluted and lengthy names like GetItemByIndex and GetItemByISBN. Method Overloading allows for much more elegant consistent code.
We also need to add an Add Method, which has a number of optional parameters. In our sample application we have passed the book, it’s isbn and sometimes we passed the position to add the book. To allow this in our own collection class, we’ll need to create Optional Parameters
Public Sub Add(ByVal item As String, ByVal isbn As String, Optional ByVal before As Integer = -1, Optional ByVal after As Integer = -1)
     If before = -1 And after = -1 Then
          col.Add(item, isbn)
     ElseIf before = -1 Then
          col.Add(item, isbn, , after)
     ElseIf after = -1 Then
          col.Add(item, isbn, before)
    End If
End Sub
The code in our Form only passes a before or an after, if one is passed at all. This method allows for that.
Go back to the code in your Form.
Replace this declaration for the Visual Basic Collection Class
Private collectionBooks As New Collection
with this declaration for our new VBBookCollection Class
Public BookCollection as VBBookCollection
Replace all references to collectionBooks in the Form with BookCollection. A quick way to do this is to click on the word collectionBooks in the declaration, Right Click on your mouse and click Rename. Another way is to click the Edit Menu, select Find and Replace and click Quick Replace.
What you have done here is create a new Property for the Form called BookCollection.
You’ve worked with properties before. Whenever you’ve changed the name of a form, you’ve changed the Name Property. Properties are items of data that manipulate the contents of the class in some way. A Form in Visual Basic is a type of class with a number of pre-defined properties. Our declaration here creates a Form Level variable, and by declaring it Public, makes the variable a Public Property. This Property which will be detected by Intellisense like the Name Property of a Form, and allow all consumers of that Form to set or read that property. It is also possible to create read only or write only properties which this MSDN article nearly describes.
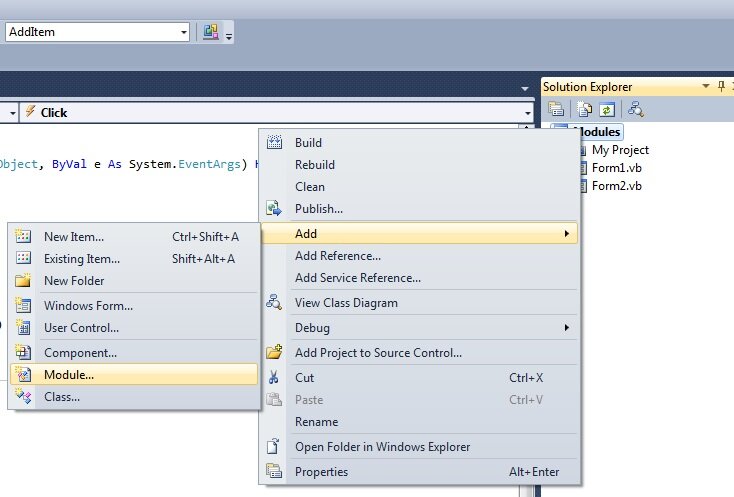
Add a new module to your project called Main
Paste in this code
Module Main
     Sub Main()
          Dim col As New VBBookCollection
          Dim myForm As New Form1

          Form1.BookCollection = col
          Form1.ShowDialog()
     End Sub
End Module
Here we have created a new instance of the Form and our new VBBookCollection Class, assigning the VBBookCollection varilable to the BookCollection Form property. Finally we show the Form as Dialog.
Typically when we run our project, Form1 is the first item in the project to run. We can change this behaviour so that the Module Main runs by default.
- Right click on the Solution explorer
- Click Properties
- Clear the “Enable application framework” checkbox in the resulting Form
- Select Sub Main as the startup object as shown below.
This instructs Visual Basic to run Sub Main at the start of the project.
Run the program and, you have, erm, exactly the same results as before. You’ve created your own collection class.
So what I hear you ask! It doesn’t do anything different to the one provided out of the box. However, now we have our own custom collection class we can make it do whatever we want.
Read the next tutorial and all will become clear.


