
Web Development with ASP.NET
For me, the most important development of the .NET Framework is the ASP.NET environment. Before ASP.NET, web development was largely a cumbersome slow affair with little access to what desktop developers took for granted i.e. debugging tools, Intellisense and a solid development environment. ASP.NET changed all that with one foul swoop and this tutorial will describe the process of Visual Basic web development with ASP.NET.
All our developments so far have been in the Windows Forms environment, or a desktop environment. This has been intentional. Windows Forms and desktop applications in general are typically quicker to run and conceptually a little bit easier to digest. They are the prefect tool to learn development with in my opinion. Before we start creating an application, it’s probably best I describe the major architectural differences which need to be considered when creating a web application in Visual Basic, or any other language.
Windows Forms applications are typically quicker as everything is normally one one computer (or some computers on one network). Validation, presentation, data access and business logic are executed in one environment running on your desktop. We have developed all of these components in Visual Basic.
In Web Development at a bare minimum you have:
- A Client. Your browser is a client. You are typically sitting at home, at work or on your mobile using your browser to make calls, via the Internet, to…
- A Web Server. Every time you interact with your web page you are in actual fact interacting with a web server. Every time you interact with a web page (e.g. clicking a link or searching for something ) a request is sent to a web server. This request may be to view another web page, or you wish to view some search results, regardless, the request is sent to the web server. The web server processes the request i.e. directs you to the new page or processes the search terms you entered and gives you the search results.
This Request/Response model is a fundamental in web development. You make a Request via a browser to a web server. The web server responds to the request, typically with a new HTML page for your browser to render. Web technologies continue to evolve enormously but browsers are still pretty dumb clients that do little but display formatted text. The vast majority (if not all) of the business logic sits on a web server often thousands of miles away from the person making the request. Things are changing but this is how the internet was designed. This is why a Google Chromebook is little more than a low powered pc and a web browser. It doesn’t need a lot of power, the web servers provide that power.
ASP.NET is based on this Request Response model as illustrated in the diagram below.
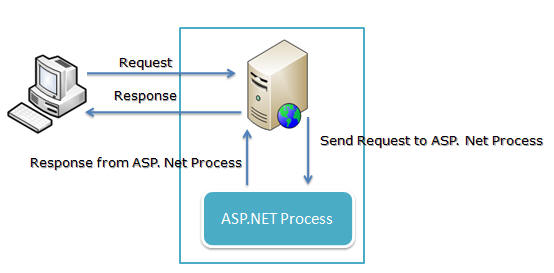
ASP.NET lives on the web server and when a browser makes a request to view a page, ASP.NET creates a page for the client to view, typically in HTML. (If you don’t really know what HTML is I’d recommend going through the linked tutorial first – HTML is what the web is built on – ASP.NET is a means of generating the HTML).
The actual steps and processing that goes into generating this HTML is huge
But don’t be intimidated, you don’t need to be aware of all these steps and by the end of this tutorial all will be much clearer.
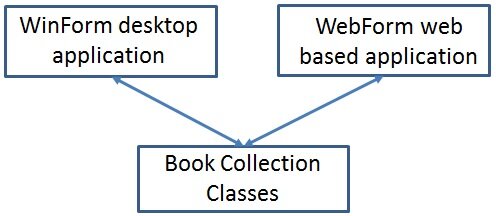
In today’s tutorial we will create a Visual Basic application in the ASP.NET environment which will reuse our BookCollection assembly we created in the previous tutorial on Namespaces. If you remember, we separated our code into two projects; one containing the presentation layer (a Windows Form) and one containing the Business Logic (the code we used to manipulate our book collection). Today we will create a new Presentation Layer in ASP.NET and access the same Business Logic layer we created yesterday.
Open Visual Studio and open the Collection class solution you created in the previous tutorial.
In your solution add a New ASP.NET Empty Web Site/Application called OnlineBooks (File >> Add New Website >> ASP.NET Empty Web Site/Application).
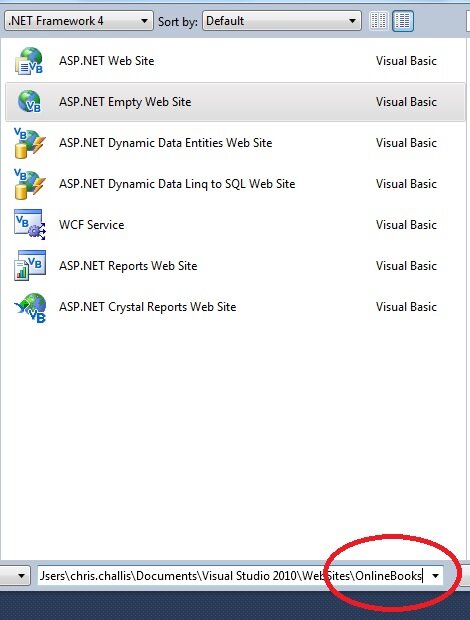
You have created a website powered by ASP.NET which is to be written in Visual Basic.NET.
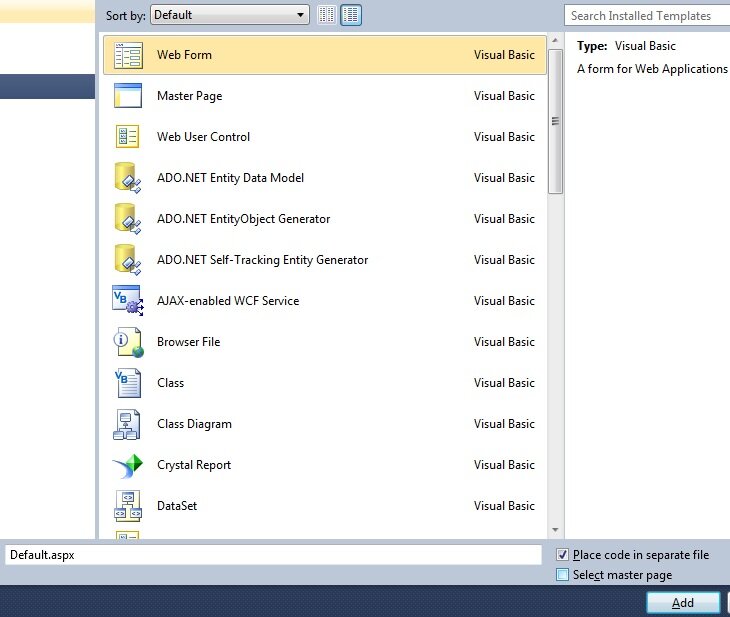
Select this new web project in the Solution Explorer. Right click on your mouse and click Click Add New Item. In the resulting dialog click “Web Form” with the name Default.aspx
An aspx file is like an HTML file. When a user makes a request to a URL that contains this file, the web server knows that it will contain code – .NET code – and it will execute that code. We can use this code to call a database, make lists, whatever we want to do, as long as we send it back formatted as HTML. In our case, we are about to create HTML pages which form a Presentation Layer that makes use of the same Book Collection classes we created for our desktop Windows Forms application.
Add a new Stylesheet to your project called style.css (Add New Item and in the resulting dialog select Stylesheet called style.css).
Paste the following into this new stylesheet:
body {
}
.H1
{
 font-family: Arial, Helvetica, sans-serif;
 font-size: xx-large;
 font-weight: bold;
}
.p
{
 font-family: Arial, Helvetica, sans-serif;
}
.label
{
 font-family: Arial, Helvetica, sans-serif;
}
.dropdown
{
 font-family: Arial, Helvetica, sans-serif;
 position:absolute;
 left:300px;
 top: 108px;
 height: 17px;
 width: 234px;
}
.isbntextbox
{
 font-family: Arial, Helvetica, sans-serif;
 position:absolute;
 left:302px;
 height: 20px;
 width: 234px;
 top: 141px;
}
.deletebutton
{
 font-family: Arial, Helvetica, sans-serif;
 position: absolute;
 left:550px;
 top: 143px;
 height: 21px;
 width: 75px;

}
.listboxbooks
{
 font-family: Arial, Helvetica, sans-serif;
}
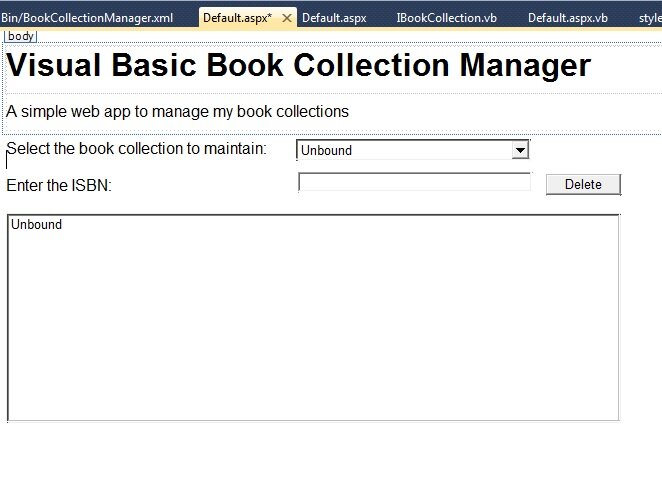
CSS, or cascading stylesheet, provides a means of formatting and styling what you see in an HTML page. It’s an industry standard and this particular stylesheet makes our Form elements look prettyt. What Form elements I hear you ask! These ones…
Select Default.aspx in your project. Right click on your mouse and select View Markup. Overwrite the code with the following.
<%@ Page Language="VB" AutoEventWireup="false" CodeFile="Default.aspx.vb" Inherits="_Default" %>

<html xmlns="http://www.w3.org/1999/xhtml">

<head runat="server">
<title></title>
<link href="style.css" rel="stylesheet" type="text/css" />
</head>

<body>
<form id="form1" runat="server">
     <div style="height: 47px">
          <h1>Visual Basic Book Collection Manager</h1>
          <p>A simple web app to manage my book collections</p>
          <p><asp:Label ID="Label1" runat="server" CssClass="label" Text="Select the book collection to maintain:">
          </asp:Label>
          <asp:DropDownList ID="DropDownListBooks" runat="server" AutoPostBack="True" CssClass="dropdown">
          </asp:DropDownList>
          </p>
          <p><asp:Label ID="Label2" runat="server" CssClass="label" Text="Enter the ISBN:">
          </asp:Label>
          <asp:TextBox ID="TextBoxISBN" runat="server" AutoPostBack="True" CssClass="isbntextbox">
          </asp:TextBox>
          <asp:Button ID="ButtonDelete" runat="server" CssClass="deletebutton" Text="Delete" />
          </p>
          <asp:ListBox ID="ListBoxBooks" runat="server" CssClass="listboxbooks" Height="210px" Width="615px">
          </asp:ListBox>
     </div>

</form>
</body>
</html>
Right click on the Default.aspx page in the Solution Explorer. Click View Designer.
You should see the following
How did this happen? If you’re familiar with HTML, click on the View Markup view of the Webfor. Take a look at the new asp tags. When a request is made for one of these pages, these pages tell ASP.NET to execute code on the server associated with these tags. The first line of code says.
<%@ Page Language="VB" AutoEventWireup="false" CodeFile="Default.aspx.vb" Inherits="_Default" %>
Which tells ASP.NET that the page is written in VB has a code file called Default.aspx.vb associated with this page.
An ASP.NET page has 3 views
- Markup – HTML with additional ASP tags. These ASP tags instruct your web server to execute asp.net code associated with these tags
- Design – A Visual Editor to generate this Markup
- Code – A code file that ASP.NET associates with this Markup
Open up the Default.aspx webform again in Design view. Double click on the form and you’ll be taken to a code window, exactly the same as the Window Form code window we know and now love. We have Events associated with the Form and the Controls and we can write code in these events.
Before we start writing code, lets first add a reference to the BookCollectionClasses we created for our desktop application.
Click on the web project OnlineBooks. Right click on your mouse and click Add Reference. (You can also click the menu Website >> Add Reference).
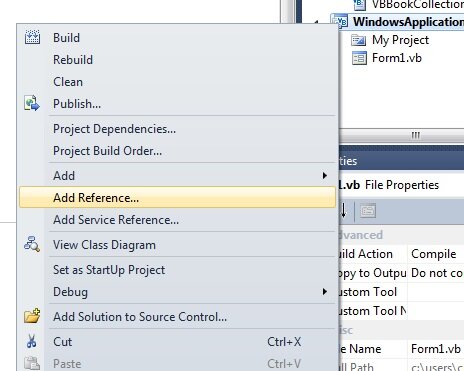
In the resulting dialog click the Projects tab and select BookCollectionManager.
You can now code against the classes you developed in BookCollectionManager, much like you could in the webform. Before coding though, there are a few common gotchas with web development which vary greatly from the desktop environment. The first is this. You have a client interacting with your app in, say, Venezuela, but your server environment is in the USA with all your lovely code. To call e.g. a button click event, the client must call the code on the server. This process is called a Postback – i.e. actions such as clicks posts data back to the server. By default, your controls will not postback to the server. Every ASP server control has a property called Autopostback. Set this property to “true” to enable postbacks. I have set the comboboxes, the buttons and the textbox to autopostback.
The second is this. When data is posted back to the server, the server responds. The response often contains the entire HTML page the user is currently browsing. Which fires the Form Load event. That’s right – every single interaction with the page which causes a postback will cause the Form Load event to fire. To stop the form load code firing every time the user presses a button, there is an IsPostBack function that you can call at any time in an ASP.NET Application. Typically, your form load will check that IsPostBack is false. Meaning this is the first time loading the page and no controls on that page have caused a postback.
Finally, as each PostBack causes the form to reload all variables are reset. It is as if you are using a new form. You actually are using a new form. Variable values will not automatically persist after a postback. You have to code for this. This is often referred to as stateless programming i.e. variables do not maintain state between requests. Microsoft have developed a few ways of overcoming this problem. To maintain the visual state of a form between Postbacks, Microsoft have developed a concept called ViewState, which maintains the visual contents of your Form between requests. This is switched on by default and I recommend leaving it on until you are much more familiar with stateless programming.
Another way to maintain visual state between requests is to use the Session object. The Session object provides a means to save variables and objects between requests. The variables remain in memory while the user is using your web application. Note, by default these session objects are stored in the webservers memory. However, in some environments, there will be multiple webservers. These webservers do not know what the other has in memory so it is relatively straightforward to configure the Session to be stored in a database or another shared memory store. There are performance overheads when you do this, however, as we are don’t need to consider that right now, lets continue.
With these gotchas in mind, now lets add our code to this form. We wish to replicate the functionality of our Winform to display, search and delete book collection items.
Add these Imports statements at the top of our Webform (above the class definition).
Imports BookCollectionManager
Imports BookCollectionManager.BookCollectionFactory
Imports BookCollectionManager.Interfaces
This indicates to Visual Basic that we will be using classes in these namespaces.
Declare this variable as a form level variable at the top of our form (below the Inherits statement). It states we have a class which implements the IBookCollection interface.
Private bookCollection As IBookCollection
Add the following methods to the form
Private Sub AddClassesToComboBox()
     DropDownListBooks.Items.Add("Non-Fiction Book Collection")
     DropDownListBooks.Items.Add("Visual Basic Book Collection")
     DropDownListBooks.SelectedIndex = 0
     GetSelectedBookCollection()
End Sub
Which populates the select book collection dropdown. Note how similar this code is to our VB desktop code. Compare the functions. It’s almost identical.
Similarly the AddBooksToListBox code should look familiar. Add this to your form.
Private Sub AddBooksToListBox()

     Dim i As Integer

     ListBoxBooks.Items.Clear()
     TextBoxISBN.Text = ""

     For i = 0 To bookCollection.Count - 1
          ListBoxBooks.Items.Add(bookCollection.Key(i) & " - " & bookCollection.Item(i).ToString)
     Next

End Sub
Add the following routine, which searches the book collection for the ISBN
Private Sub SearchBooks()

     Dim searchText As String

     ListBoxBooks.Items.Clear()
     searchText = Trim(TextBoxISBN.Text)
     ButtonDelete.Visible = False

     If searchText = "" Then
          AddBooksToListBox()
     ElseIf bookCollection.Contains(searchText) Then
          ListBoxBooks.Items.Add(bookCollection.Item(searchText))
          ButtonDelete.Visible = True
     Else
          ListBoxBooks.Items.Add("There are no books in Chris’ collection with that ISBN")
     End If

End Sub
Add the following routine which uses the Collection Factory to create a new instance of the bookCollection based on what the user selected
Private Sub GetSelectedBookCollection()

     Dim bookCollectionFactory As New BookCollectionFactory

     Select Case DropDownListBooks.SelectedIndex
          Case -1
               DropDownListBooks.SelectedIndex = 0
          Case 0
               bookCollection = bookCollectionFactory.GetBookCollection(CollectionType.NonFiction)
          Case 1
               bookCollection = bookCollectionFactory.GetBookCollection(CollectionType.VBBook)
     End Select

     AddBooksToListBox()

End Sub
Add this routine to delete a book from the collection
Private Sub DeleteBook()

     Dim searchText As String

     searchText = Trim(TextBoxISBN.Text)

     bookCollection.Remove(searchText)

     TextBoxISBN.Text = ""
     ButtonDelete.Visible = False

     AddBooksToListBox()

End Sub
Add this code to your Form Load Event
If Not IsPostBack Then
     ButtonDelete.Visible = False
     AddClassesToComboBox()
Else
     bookCollection = Session("bookCollection")
End If
This is the first major deviation from our WinForm application. If the Form is loaded for the first time (ie this is not a postback) then the code is identical. If this is a postback we are using the Session Object to to maintain state between server requests.
Add this code to the Page_SaveStateComplete event. The code saves the bookCollection object in the Session Object and will remain in memory while the user is using the application. This event is called every time a postback is called (just after the ViewState has saved).
Session("bookCollection") = bookCollection
The next 3 events merely call routines we have defined above.
Protected Sub ButtonDelete_Click(ByVal sender As Object, ByVal e As System.EventArgs) Handles ButtonDelete.Click
     DeleteBook()
End Sub

Protected Sub DropDownListBooks_SelectedIndexChanged(ByVal sender As Object, ByVal e As System.EventArgs) Handles DropDownListBooks.SelectedIndexChanged
     GetSelectedBookCollection()
End Sub

Protected Sub TextBoxISBN_TextChanged(ByVal sender As Object, ByVal e As System.EventArgs) Handles TextBoxISBN.TextChanged
     SearchBooks()
End Sub
*Note the TextChanged event only fires when you press the enter key.
And this final event
Protected Sub Page_PreRender(ByVal sender As Object, ByVal e As System.EventArgs) Handles Me.PreRender
     ButtonDelete.Attributes.Add("OnClick", "return confirm('Do you really want to delete this book?')")
End Sub
Gets over the final gotcha of the day. In a desktop app you can display a MessageBox to capture user interaction. If you do this in ASP.NET, the messagebox appears on the webserver. The user is often thousands of miles away. Doh. This routine uses server side code to add a Javascript client side message box to ensure the user really wants to delete the object. If they click yes, the OnClick server side routine is called.
Run your application. You have two applications in two totally different environments accessing the same set of business objects.
You have developed a robust well architected multi channel application in VB.NET. Think about that for a moment. Ponder what you’ve achieved here. Think just how far you’ve come.